Before starting, the first step is to select a suitable location. The ground must be flat and solid, otherwise it will affect the stability and lifespan of the gazebo. Recommended surfaces include concrete, wooden decking, or tiled floors, as they provide a strong base for bolts.
Also, make sure to leave enough surrounding space—at least 50–100cm on each side—for movement and maintenance.
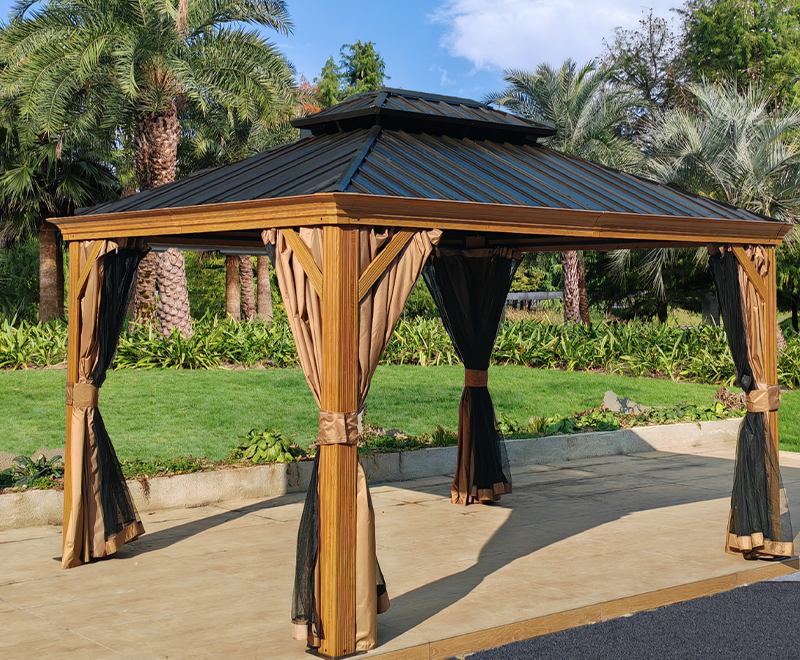
When considering the environment, avoid placing the Hardtop Gazebo directly under large trees, as falling leaves or branches may block the roof drainage or pose safety hazards in strong winds.
Having the right tools and materials will make the installation process much smoother. Common tools include:
Drill (for ground fixing), screwdriver, wrench, rubber mallet (for gentle adjustments), level (to check vertical and horizontal alignment), measuring tape (for accurate measurements), and ladders (preferably two, for easier teamwork).
For safety, always wear protective gloves and safety goggles.
In addition to the parts supplied by the manufacturer, you will also need expansion bolts or anchor screws (to secure the posts) and silicone sealant (to prevent water leakage).
After unpacking, lay out all parts neatly and classify them according to the manual. Carefully check the parts list to ensure nothing is missing or damaged. If anything is absent, contact the supplier before starting the installation.
Begin by installing the four main posts vertically at the chosen location. Ensure each post is upright by checking with a level.
Secure the bases firmly to the ground using expansion bolts or anchor screws, ensuring stability against wind and weight.
Attach the beams and connectors to the top of the posts to form the basic frame.
It is recommended to have at least two people working together—one holding and aligning parts, the other securing them. At this stage, do not fully tighten the screws. Tighten them only after the frame is fully assembled and aligned.
Once the top frame is ready, start installing the rafters and central support to create the roof framework.
Secure each part with bolts, but avoid over-tightening until all parts are in place, so adjustments can still be made if necessary.
Begin at one corner of the roof and install the metal or polycarbonate panels one by one.
Make sure each panel is aligned properly and fasten it with the provided clips or screws. Keep the panels consistent in direction and check for gaps to ensure proper sealing.
After all panels are installed, apply silicone sealant along the joints to prevent water leakage.
Finally, double-check all screws and connectors to confirm they are fully tightened and the gazebo is secure.
Depending on your needs, you can add mosquito nets, shade curtains, or hooks to enhance the usability and comfort of your gazebo.
Gently shake the structure to confirm there are no loose parts or tilting. If instability is detected, adjust and reinforce bolts or anchors immediately.
Pack up all tools and leftover materials. Finally, wipe the gazebo with a dry cloth or rinse with clean water to maintain its appearance.
Regularly use clean water to wash the roof and frame, preventing dust and stains from building up. Avoid strong acidic or alkaline cleaners, as they may corrode metal or damage the coating.
If you live in a windy area, consider using extra ground anchors or guy ropes to improve wind resistance and ensure safety.
In regions with heavy snowfall, remove snow from the roof promptly to avoid excessive weight that may deform or damage the panels.
The company has 20 professional and technical personnel and more than 200 company employees; it covers an area of 15,000 square meters. We are an enterprise specializing in the production, design and sales of metal products.
No. 137-1, Zhangjia, Shangtian, Fenghua, Ningbo, China
justin.gao@vip.163.com
+86-13867888253
OEM/ODM Hard Top Tent/Shelter Manufacturers
Copyright © Ningbo Jinjin Leisure Co., Ltd. All Rights Reserved.
![]()
 English
 中文简体
中文简体 Français


